Provisioning packagesProvisioning packages – Deploy and upgrade operating systemsProvisioning packages
Provisioning packages are created using the Windows Configuration Designer, which is included in the Windows Assessment and Deployment Kit (Windows ADK). You can also download the standalone Windows Configuration Designer app from the Microsoft Store.
Note Download Windows ADK
You can download the Windows ADK from the Microsoft website at https://docs.microsoft.com/windows-hardware/get-started/adk-install. Ensure that you download the version of the Windows ADK that matches the version of Windows 10 that you intend to deploy.
Provisioning packages use very small configuration files. These are used to modify existing Windows 10 installations and configure their runtime settings.
A provisioning package can perform a variety of functions, such as:
- Configure the computer name and user accounts.
- Add the computer to a domain.
- Upgrade the Windows 10 version, such as Windows 10 Home to Windows 10 Enterprise.
- Configure the Windows user interface.
- Add additional files or install apps.
- Remove installed software.
- Configure network connectivity settings.
- Install certificates.
- Implement security settings.
- Reset Windows 10.
- Run PowerShell scripts.
To create a provisioning package, you should complete the installation process of Windows Configuration Designer using either the Windows ADK or the Microsoft Store. Once you have done so, you are ready to create and deploy your provisioning packages. Start by opening Windows Configuration Designer. On the Start page displayed in Figure 1-1, select the option that best describes the type of provisioning that you want to do. If you’re unsure, choose the Advanced Provisioning tile.

Figure 1-1 Creating a new provisioning package
Use the following procedure to create your provisioning package to deploy a universal line of business (LOB) app:
- Select the Advanced provisioning tile.
- In the New project wizard, on the Enter project details page, enter the name and a meaningful description for your provisioning package. For example, enter Deploy LOB App1 and then select Next.
- On the Choose which settings to view and configure page, select All Windows desktop editions and select Next.
- On the Import a provisioning package (optional) page, select Finish. (You can use this option to import settings from a previously configured package that mostly, but not entirely, meets your needs.)
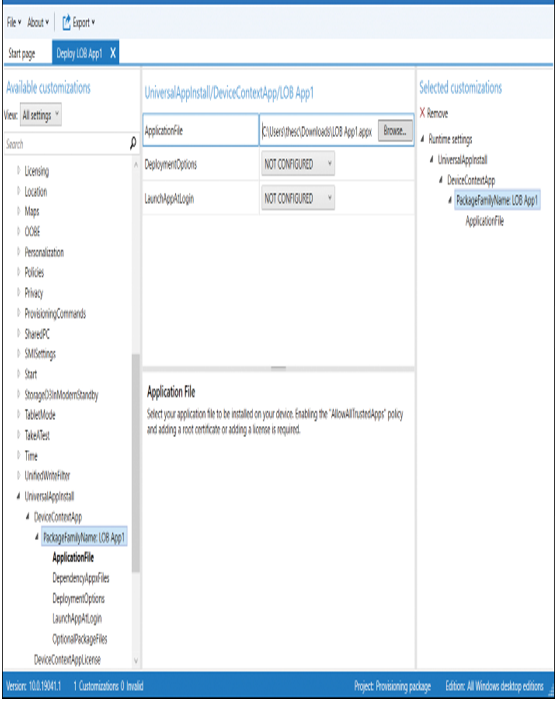
- On the Available customizations page, in View, select All settings, and then expand Runtime settings, as displayed in Figure 1-2.
- On the Available customizations page, in the navigation pane, expand UniversalAppInstall and then select DeviceContextApp.
- In the details pane, in the PackageFamilyName text box, enter a name for this collection of apps. For example, enter LOB App1.
- Select the PackageFamilyName: LOB App1 node.
- In the ApplicationFile text box, select Browse, navigate to the .appx file that represents your app, and select it, as displayed in Figure 1-2.
- In the File menu, select Save and note the location of the saved provisioning package file.

Figure 1-2 Available customizations for your provisioning package
You have created a customization for your app, and you are now ready to deploy this customization by applying the provisioning package.
Note Deploy Powershell Scripts from Provisioning Packages
If you want to use PowerShell scripts with provisioning packages, you need to select All Windows Desktop Editions on the Choose Which Settings To View And Configure page within Advanced Provisioning. You can then add command-line files in the Runtime Settings\ProvisioningCommands\DeviceContext area of the available customizations. To view detailed information about using scripts in provisioning packages, visit this Microsoft website at https://docs.microsoft.com/en-us/windows/configuration/provisioning-packages/provisioning-script-to-install-app.

