When you build a report, a common requirement is to keep the underlying data up to date. You can refresh a dataset manually in Power BI Desktop or the Power BI service, but this approach isn’t viable when you need to refresh data periodically. To address this issue, you can configure a scheduled refresh in the Power BI service.
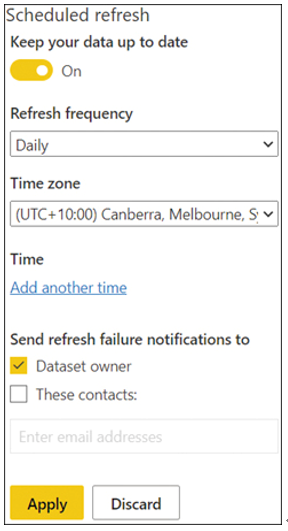
You configure a scheduled refresh for each dataset individually in the dataset settings. For this, expand the Scheduled refresh section of the dataset settings and switch the Keep your data up to date toggle to On. You will then be able to configure refresh frequency and other settings, as shown in Figure 4-1.
FIGURE 4-1 Scheduled refresh settings.
You can configure the following settings for scheduled refresh:
Refresh frequency Specify how often the dataset will be refreshed: Daily or Weekly. If you set this option to Weekly, you can select the days of the week the refresh will run.
Time zone The time zone of refreshes.
Time You can add the time of refreshes in 30-minute intervals. The maximum number of refreshes you can set depends on whether the workspace is backed by a Premium capacity.
Send refresh failure notifications to This option can send an email to the dataset owner in case of a refresh failure. You can enter email addresses of other users who will receive the notifications, which can be useful when multiple people are responsible for the dataset.
After you adjust settings, select Apply. If you select Apply without setting the scheduled refresh time, your dataset will refresh at midnight.
You can see refresh history of a dataset at the top of the dataset settings by selecting Refresh history.
Collaboration in Power BI happens in workspaces, which serve as containers for dashboards, reports, workbooks, datasets, and dataflows. In this section we cover how to create and configure a workspace and illustrate how the Power BI service lifecycle strategy can help you implement phased deployments. We also review the skills necessary to create and manage workspaces, assign roles, publish and update apps and workspace assets, and apply sensitivity labels to workspace items.
Each Power BI user has access to their own workspace, called My workspace, and only they can publish to the workspace. Though it’s possible to share content from a personal workspace, the functionality is limited—for example, you cannot create an app in your workspace.
To collaborate with others or package content in an app to share with others, you should create a separate workspace. Doing so will allow others to publish to the same workspace, and you’ll have access to other Power BI features, such as dataflows.
Note Creating Workspaces
A user who wants to create a workspace requires at least a Power BI Pro license.
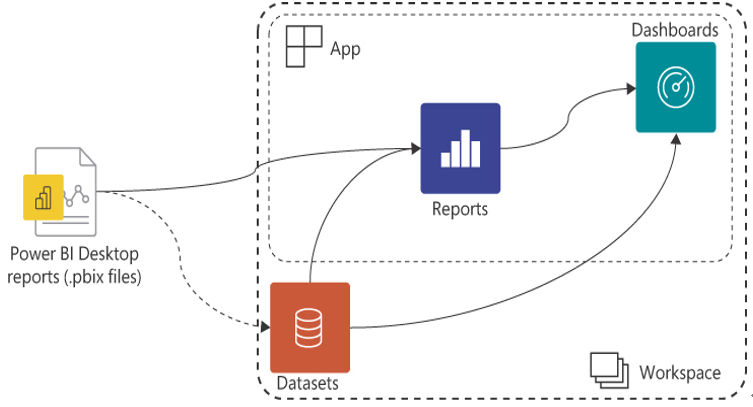
Figure 4-9 shows a diagram with a simplified relationship between Power BI Desktop reports and Power BI service items.
FIGURE 4-9 Power BI workspace contents.
When you publish a Power BI Desktop to a workspace, you publish the visualizations, which become a report in Power BI service. If there was an associated data model, it would become a Power BI dataset. As discussed in Chapter 3, “Visualize and analyze the data,” dashboards can have visuals pinned from reports and directly from datasets. We review Power BI apps later in this chapter in detail.
To create a workspace in Power BI service, follow this procedure:
From the left-hand menu, select Workspaces > Create a workspace.
Enter the workspace name. The name must be unique in the organization.
Select Save.
When creating a workspace, you can optionally set a workspace image and enter a workspace description. Furthermore, you can use the following advanced settings:
Contact list You can select who will receive notifications about issues in the workspace. By default, it will be workspace admins, or you can enter specific users and groups.
Workspace OneDrive To have the option to add items to the workspace from a dedicated OneDrive location, you can enter it here. Note that there’s no synchronization between the Power BI workspace membership and those who have access to the OneDrive location. You should give access to the workspace to the same Microsoft 365 group that owns the OneDrive location. Managing OneDrive is outside the scope of this book.
License mode If your organization uses Power BI Premium and you’re a capacity admin, you can allocate this workspace to a dedicated capacity. Administration of Power BI Premium is outside the scope of this book.
Develop a template app You can develop a template app and share it with users outside of your organization. Template apps are outside the scope of this book.
Allow contributors to update the app for this workspace By default, contributors cannot update workspace apps; you can change this by selecting this check box.
Once you’ve created a workspace, you can change its settings in Power BI service in the following way:
From the left-hand menu, select Workspaces.
Find the workspace of interest, hover over it, and select More > Workspace settings.
Change the settings as desired.
Select Save.
To delete a workspace, select Delete workspace > Delete from the workspace settings.
As you saw with the View as feature in Power BI Desktop, you can test roles in the Power BI service. For this, you need to hover over a role on the Row-Level Security page and select More options (the ellipsis) > Test as role. You will then see the way a report appears to the members of the role. For example, Figure 4-4 shows what members of the Plains role would see, which you created in Chapter 2, “Model the data.” The role applies a filter on Sales Territory.
FIGURE 4-4 Testing a role in the Power BI service.
If needed, you can test a combination of roles or view as a specific user by selecting Now viewing as in the blue bar at the top and selecting the desired parameters. Once you are satisfied with how the roles work, you can select Back to Row-Level Security.
Important Row-Level Security and Workspace Roles
Row-level security does not work on users who have the Contributor, Member, or Admin role in the workspace in which the dataset resides. Those who have edit rights will always see the whole dataset regardless of the security settings, even though the Test as role feature may show a filtered dataset.
We review workspace roles in Skill 4.2: Create and manage workspaces.
Provide access to datasets
The Power BI service enables collaboration between different users. To let other users build reports based on a dataset that you published, you have to share the dataset with them. There are several ways of achieving this, as described next.
Sharing through a workspace
When publishing to the Power BI service, you can publish to your own workspace or a shared workspace. Contributing users of shared workspaces will automatically have access to the dataset you publish.
When you are ready to share your reports and dashboards with users in your organization, you can publish an app. An app is a collection of Power BI items, such as a dashboard, reports, and workbooks, packaged together. There can be only one app per app workspace.
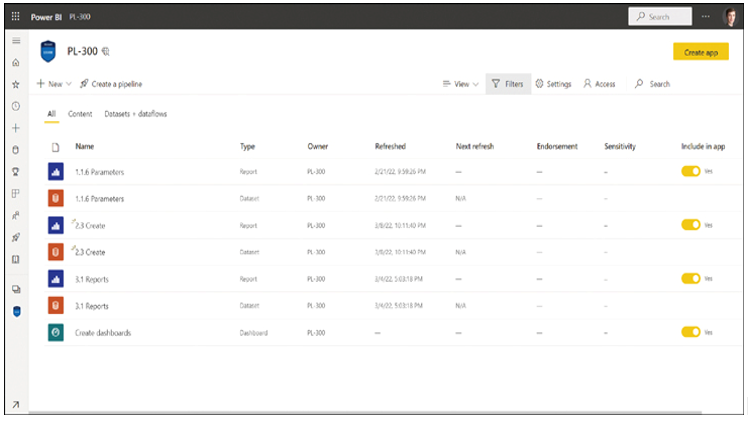
When creating or updating an app, you can select which content items appear in the app by toggling the Include in app switch to Yes or No, as shown in Figure 4-10.
FIGURE 4-10 Include in app switch.
Note that datasets and dataflows cannot be included in the app.
To publish an app from a workspace, select Create app. If an app already exists, you’ll see Update app instead. There are three steps in app configuration:
Setup
Navigation
Permissions
Setup
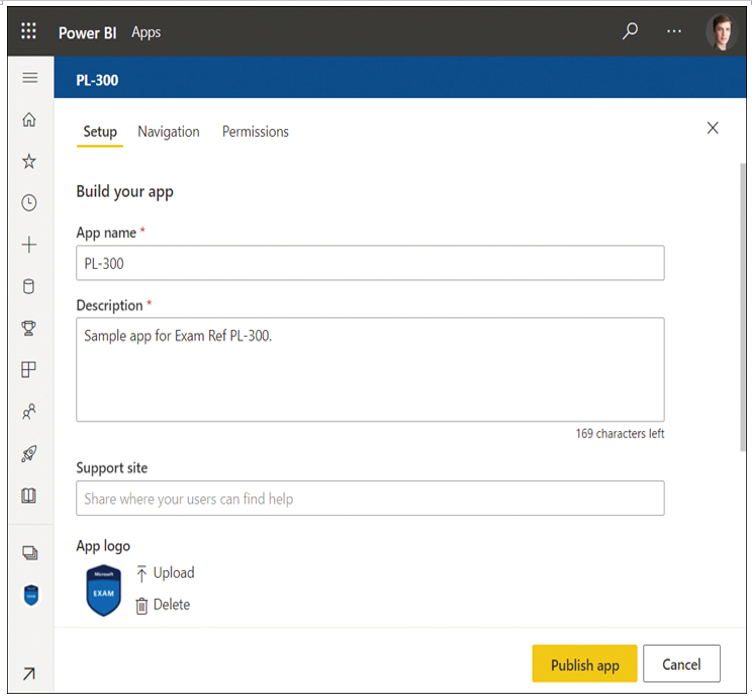
When you select Create app or Update app, you’ll be taken to app setup, as shown in Figure 4-11.
FIGURE 4-11 App setup.
To publish an app, specify the app name and description. Additionally, you’ll see the following options on the Setup screen:
Support site Share where your users can find help related to the app.
App logo By default, the app logo is the same as the workspace image. You can provide a different one here.
App theme color This color will be used for the app menu and navigation.
Contact information You can select the app publisher, workspace contacts, or specific individuals or groups.
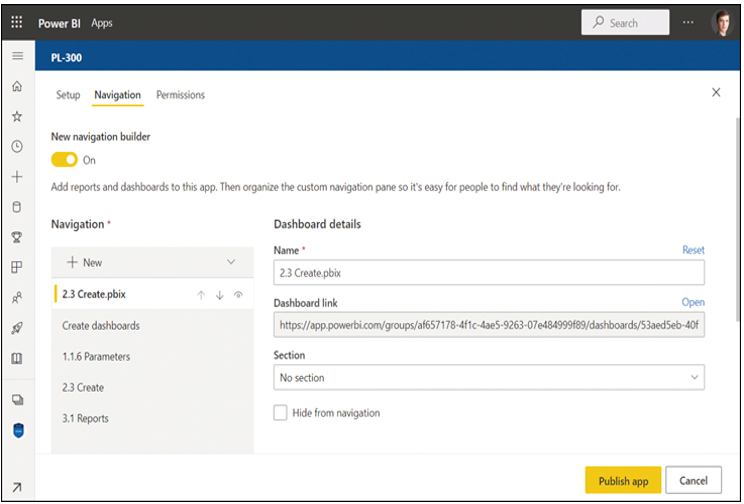
Navigation
In the navigation step, you can customize the navigation pane. In addition to selecting the navigation pane width under the Advanced options, you can rename, reorder, hide, and group app content items under Navigation.
To group app content items, you must create a section first by selecting New > Section and giving it a new name. Then you can select an app content item and select a section from the Section dropdown list.
Furthermore, you can add links to the navigation pane. For each link, you can select where to open it:
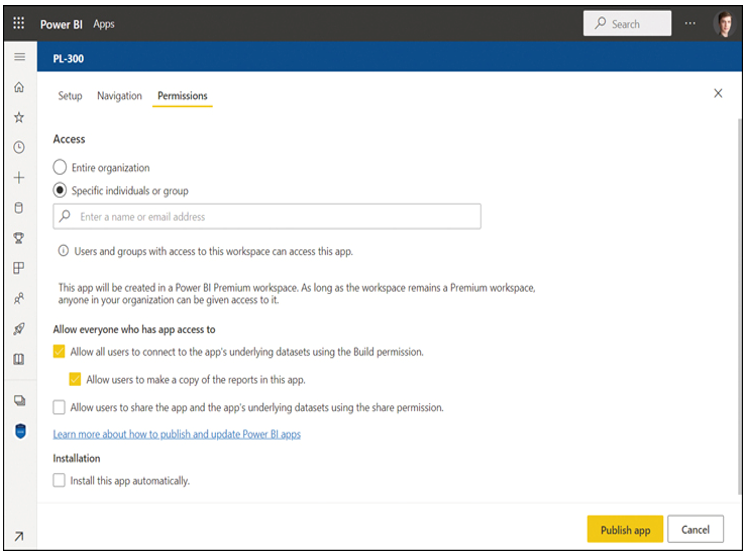
On the Permissions screen, you can select who has access to the app. You can grant access to the entire organization or specific individuals or groups. If you only grant access to specific individual or groups, you can select Install this app automatically so that it automatically appears in the Apps section of the Power BI service for each user—otherwise, each user will have to install the app manually from the Apps section.
Note Access for Workspace Users
Users and groups with access to a workspace can access the corresponding app without you explicitly granting them access.
For users with access to the app, you can grant the following rights:
Allow all users to connect to the app’s underlying datasets using the Build permission Although the datasets won’t show up in the app, this setting allows you to connect to datasets from Power BI or use Analyze in Excel.
Allow users to make a copy of the reports in this app This setting allows users to copy reports to their personal workspaces to customize them. It is available only if the Build permission is granted.
Allow users to share the app and the app’s underlying datasets using the Share permission Note that connecting to the datasets requires the Build permission.
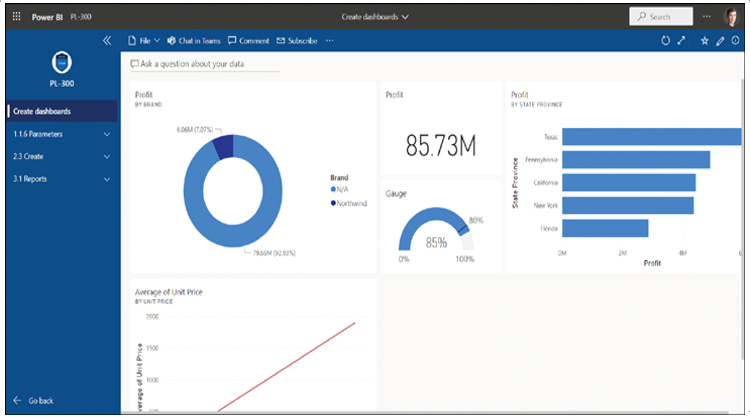
Once you publish an app, the result will look like Figure 4-14.
FIGURE 4-14 App view.
Note that the interface only has the app navigation; to go back and see the standard Power BI sidebar, you can select Power BI in the upper-left corner.
Update a published app
After you publish your app, you can make changes to it if you are a contributing workspace user. For this, you need to go to the app workspace and make the changes you want; once you have made the changes, go back to the app workspace list of contents and select Update app. You can also update the Setup, Navigation, and Permissions settings that you configured when you created the app, and then select Update app > Update to propagate the app changes.
Note that on the Permissions screen, you will see the app link, as well as dashboard and report links. When you share any of those links, users will see all contents of the app, not just dashboards or reports.
Unpublish an app
If you want to unpublish an app, you can do so from the app workspace by selecting More options > Unpublish app > Unpublish. Doing so will not delete the app workspace contents; instead, the app will be removed from the list of apps of each user and become inaccessible.
You can publish a report to the Power BI service from Power BI Desktop by selecting Publish on the Home ribbon. To publish a report from Power BI Desktop, you must be signed in. By default, your report will be published to your personal workspace, unless you already published to another workspace in the same session. If you are a contributor in other workspaces, you can select a workspace to publish to.
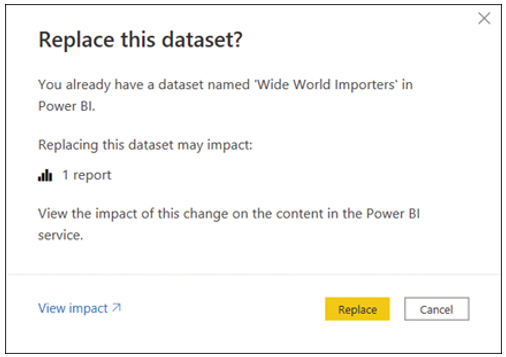
If the workspace you are publishing to already contains a dataset with the same name, you will be asked if you want to replace it, and you’ll see how many workspace items it affects, as shown in Figure 4-15. This feature can be particularly useful when you’re updating a dataset that has other reports built from it.
FIGURE 4-15 Dataset impact.
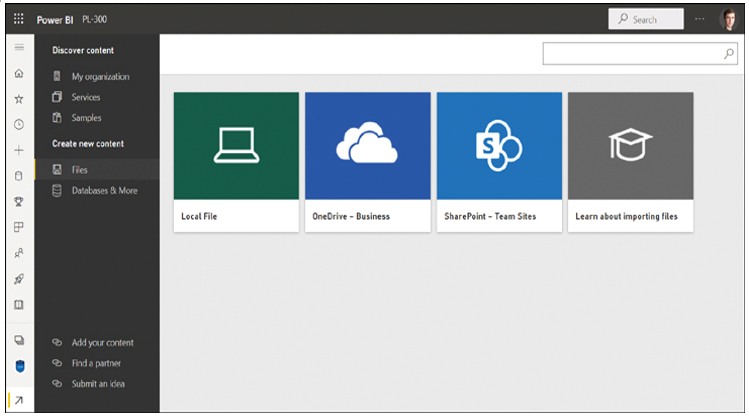
An alternative to publishing from Power BI Desktop is to publish from the Power BI service by going to a workspace and selecting New > Upload a file. You’ll be given a choice to publish a local file, a file from OneDrive, or a file from SharePoint, as shown in Figure 4-16.
FIGURE 4-16 Creating new content from files.
Selecting Local File will prompt you to select a file from your computer to publish, whereas OneDrive and SharePoint options allow you to publish from the cloud. Publishing from OneDrive can be beneficial because you can edit a report locally in Power BI Desktop in a folder that’s synced to OneDrive, and it will be published automatically upon saving and closing the file because Power BI can sync published files from OneDrive.
Apply sensitivity labels to workspace content
Within an organization, different data may have different security levels. For example, some data must not leave a specific department, and other data may be shared publicly. To help users understand the sensitivity level of workspace content, you can apply sensitivity labels.
Note Enabling Sensitivity Labels
For users to be able to apply sensitivity labels, they must be enabled in Power BI admin portal tenant settings, typically by the central IT department in the organization. The admin portal is out of the scope of the exam. For more information, see “Enable sensitivity labels in Power BI” at https://docs.microsoft.com/en-us/power-bi/admin/service-security-enable-data-sensitivity-labels.
When information protection is enabled in your Power BI tenant, you can set a sensitivity label for a workspace item in the following way:
Go to the settings of a workspace item.
Select a sensitivity label from the dropdown list under Sensitivity label.
Optionally, check Apply this label to the dataset’s downstream content or similar.
Select Apply or Save.
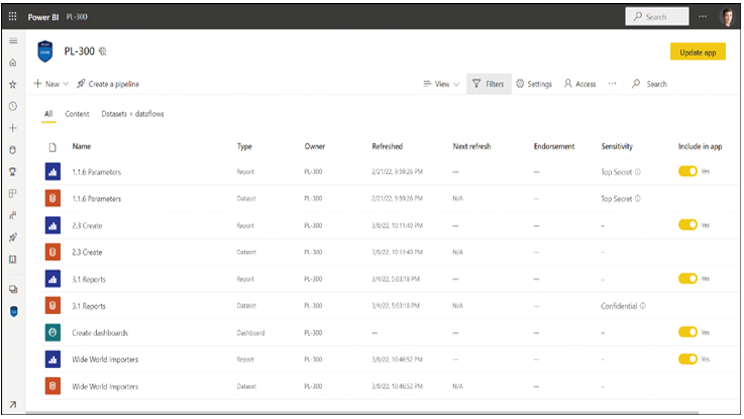
After you set a sensitivity label, it will be displayed when anyone views the item, as well as in the list of workspace contents, as shown in Figure 4-17.
FIGURE 4-17 Sensitivity labels.
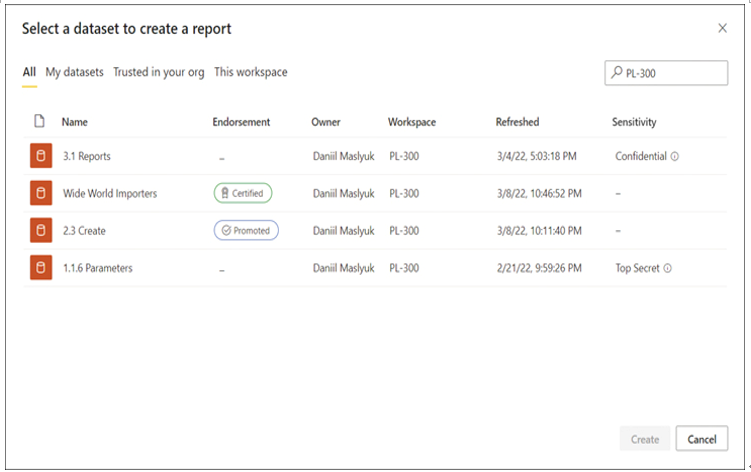
Note how two reports have sensitivity labels shown in the Sensitivity column. If you hover over a sensitivity label, you’ll see its description.
When you create Power BI content and share it, you can increase its visibility for other users by endorsing it. For example, other users can search for an endorsed dataset and build reports from it. When many datasets are available in the organization, it’s useful to know how reliable each dataset is—some may be created for test purposes only, whereas others may be considered a single source of truth in the company. By default, all datasets look the same when you search for datasets, be it from Power BI Desktop or the Power BI service. In this case, it may be a good idea to endorse datasets—let the reports creators know which datasets are high quality and reliable.
You can endorse datasets, dataflows, reports, and apps. There are two ways to endorse Power BI content:
Promote Promoted content has a badge that signifies that the content is ready to be used by others. Any contributing member of the workspace where the content resides can promote it. Content promotion facilitates the content being reused across the organization.
Certify Content can be certified to show that it’s recommended for use, meaning it is highly reliable and curated. Only people selected by the Power BI tenant admins can certify Power BI content.
Note Endorsing Different Types of Power BI Content
The process of endorsing all content types is the same. For ilustration purposes, next we review how to endorse a dataset.
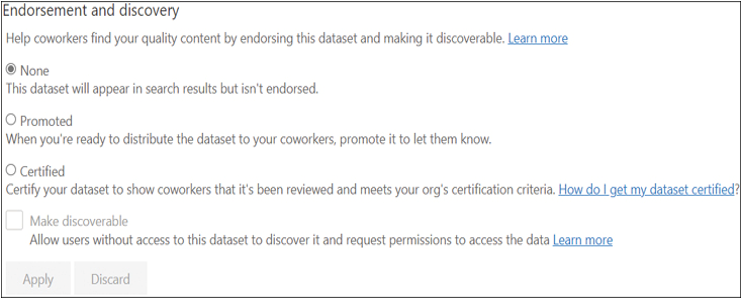
A dataset can be promoted or certified in the Endorsement and discovery section of the dataset settings in Power BI service, as shown in Figure 4-20.
FIGURE 4-20 Endorsement.
Once you select Promoted or Certified, select Apply to save the changes.
Note Dataset Description
To help users understand what they can use a dataset for, you can add a description in the Endorsement section as well.
If the Certified option is inactive, it means you cannot certify datasets yourself. In this case, you should request dataset certification from those who were selected by your Power BI tenant admins to certify datasets. Those who can certify datasets may not always be members of the workspace that contains the dataset. If that’s the case, the person who can certify a dataset will need to become a contributing member of the workspace.
You can see the Certified and Promoted badges in Figure 4-21.
Windows 10 offers organizations new and exciting methods for deploying the operating system to users. However, traditional on-premises image creation-based deployment methods continue to be supported and are widely used. You can expect that the adoption of the new dynamic deployment methods will gain traction in the modern workplace and will be featured in the MD-101 exam. You must understand when these methods should be implemented over more traditional methods.
Embarking on any new project should be carefully planned so that the delivery can be given every chance of success. This is especially applicable when deploying Windows 10 within an enterprise environment.
There are several tools and services available to help you evaluate, learn, and implement Windows 10. By following best practices and avoiding making deployment mistakes, you can ensure that your users are productive and that the project is delivered on schedule.
Windows 10 is released using a continuous delivery model known as Windows as a Service, with a new version of Windows 10 available every six months. Therefore, the skills you learn in deploying Windows 10 to your users will be reused again, and often.
It is recommended that you choose a group of users and deploy Windows 10 into focused pilot projects. This enables you to test each version of Windows 10 within your organization before rolling out the operating system to larger cohorts of users.
Plan pilot deployments
Each organization is different, and therefore, you must determine which deployment method (or methods) you will use. For example, you may choose to deploy new devices to your remote salesforce using Windows Autopilot and perform an in-place upgrade of your head office computers using the in-place upgrade method, perhaps.
To make effective decisions relating to the deployment method, you should perform testing in a non-production environment, and if you are successful, you should proceed to roll out Windows 10 to a small group of users.
By breaking down your Windows 10 deployment project into multiple stages, you can identify any possible issues and determine solutions where available. This will involve documenting and obtaining feedback from stakeholders at each stage. The first stage of deploying the operating system will be with a pilot deployment.
As part of the pilot, it’s important to determine the following:
Production hardware, including PCs, laptops, and tablets, meets the minimum hardware requirements for Windows 10.
Peripherals, such as printers, scanners, projectors, and other devices, are compatible with Windows 10.
All required device drivers are available.
All apps required following the deployment will work on Windows 10.
Any existing third-party disk encryption will work with Windows 10 (alternatively replaced with BitLocker Drive Encryption).
Your IT support staff has the necessary skills to support Windows 10.
The pilot is essential because it can be useful to ensure compatibility with existing hardware, apps, and infrastructure, and it provides you with an insight to the gains and potential pitfalls that you are likely to encounter during the later stages of the roll-out program. By reviewing and implementing feedback gained during the pilot phase, you can seek to minimize the future impact of any problems encountered.
If you find that your existing IT support staff doesn’t have the necessary skills to support Windows 10, you may use the pilot deployment phase to identify any training needs; doing so gives you time to implement the recommendations before a larger roll-out. You should also consider your non-technical users, who may require information relating to the new operating system so that their day-to-day productivity is not affected by the adoption of the new operating system.
You can also use the pilot to help to determine user readiness for Windows 10 and to identify any training needs—for both users and IT support staff.
Evaluate and select an appropriate deployment option
Dynamic provisioning of Windows 10 using modern tools including mobile device management solutions offers organizations new deployment choices. Many of these options were not available when deploying previous versions of Windows using traditional deployment methods. Table 1-2 provides a summary comparison between modern dynamic provisioning and traditional deployment methods, which can also incorporate image creation.
TABLE 1-2 Provisioning methods
Dynamic provisioning methods
Traditional deployment methods
Enrollment into Azure Active Directory and Mobile Device Management (such as Microsoft Intune)
On-premises deployment tools using Windows ADK, Windows Deployment Services, Microsoft Deployment Toolkit, or Configuration Manager
Provisioning packages using Windows Configuration Designer
Bare-metal install
Subscription Activation
In-place upgrade
Windows Autopilot
Wipe-and-load upgrade
The deployment choices available to an organization may be skewed by the existing investment it has made in traditional deployment methods and infrastructure. This may include reliance upon on-premises tools and procedures, such as using Microsoft Deployment Toolkit (MDT) and Endpoint Configuration Manager for Windows 7 and newer versions. These tools continue to be supported and can be used to support on-premises deployment methods, such as bare-metal, refresh, and replace scenarios. You should understand the modern alternatives to the traditional on-premises methods.
Deploying Windows 10 using modern cloud-based deployment and dynamic provisioning methods includes using subscription activation, Windows Autopilot, and Azure Active Directory (Azure AD) join. Ongoing management of Windows 10 is then undertaken using Mobile Device Management (MDM), such as Microsoft Intune.
Dynamic provisioning
You should see a theme throughout this book, which is to recommend an alternative method of provisioning client devices to the traditional approach, which would typically include the following stages:
Purchase or re-provision a device.
Wipe the device.
Replace the preinstalled operating system with a customized image.
Join an on-premises Active Directory.
Apply Group Policy settings.
Manage apps using Configuration Manager or MDT.
With a cloud-based deployment approach, the stages are simplified to the following:
Purchase or re-provision a device.
Apply a transformation to the preinstalled operating system.
Join Azure AD and enroll in MDM.
Use MDM to configure the device, enforce compliance with corporate policies, and to add, remove, and configure apps.
There is a significant difference between the two approaches. Dynamic provisioning seeks to avoid the need for on-premises infrastructure and resource intensive reimaging procedures.
Because Windows 10 is updated twice a year to a newer version—with each new version supported for a maximum of 18 months (30 months for Enterprise and Education editions)—maintaining customized deployment images can become a costly process and burdensome for the IT department.
The types of transformations that are currently available using dynamic provisioning include the following:
Provisioning packages A provisioning package is created using the Windows Configuration Designer and can be used to send one or more configurations to apps and settings on a device.
Subscription Activation Windows 10 Subscription Activation allows you to automatically upgrade devices with Windows 10 Pro to Windows 10 Enterprise without needing to enter a product key or perform a restart.
Azure AD join with automatic MDM enrollment A device can be joined to Azure AD and automatically enrolled into the organizational MDM solution by having users enter their work or school account details. Once enrolled, MDM will configure the device to the organization’s policies.
To apply a provisioning package, you must start by exporting the package. To export your provisioning package, in the Windows Configuration Designer, use the following procedure:
Select the project file from the Recent Projects area of the Start page or select File and locate the project file. (It should use the name of the project and have an .icdproj file extension.)
On the menu bar, select Export > Provisioning package.
In the Build wizard, on the Describe the provisioning package page, the Name box is already complete with the project name. You can now specify the Package Version number and Owner information, such as IT Admin. Complete this information and select Next.
On the Select security details for the provisioning package page, choose whether you want to encrypt or sign your package (or both) and then select Next. (To digitally sign your package, you must have an appropriate digital certificate that users of your package trust.)
On the Select where to save the provisioning package page, specify where you want to store the package and then select Next.
On the Build the provisioning package page, select Build. Your provisioning package is exported to your specified location.
The All done page appears. Make a note of the package details and then select Finish.
You can now apply the package to client devices and run the .ppkg file.
Once you have configured the settings within the Windows Configuration Designer, you export the provisioning package to a .ppkg file. To secure the .ppkg file, you can optionally choose to encrypt the package and digitally sign it. Once signed, only packages that are trusted can be applied on a client computer.
You can deploy the provisioning package to users by any method, such as email, physical media, or by sharing the file using OneDrive for Business. The settings are applied to the target device by one of the following methods:
Running the .ppkg file
Adding the provisioning package using the Settings app
Using the Add-ProvisioningPackage Windows PowerShell cmdlet
Provisioning packages can be applied to a device during the first-run experience when a device is first turned on by using a USB drive containing the provisioning package or after the Out-Of-Box Experience (OOBE) has been completed.
Need More Review? Provisioning Packages for Windows 10