Provisioning packagesProvisioning packages – Deploy and upgrade operating systemsProvisioning packages

Provisioning packages are created using the Windows Configuration Designer, which is included in the Windows Assessment and Deployment Kit (Windows ADK). You can also download the standalone Windows Configuration Designer app from the Microsoft Store.

Note Download Windows ADK

You can download the Windows ADK from the Microsoft website at https://docs.microsoft.com/windows-hardware/get-started/adk-install. Ensure that you download the version of the Windows ADK that matches the version of Windows 10 that you intend to deploy.

Provisioning packages use very small configuration files. These are used to modify existing Windows 10 installations and configure their runtime settings.

A provisioning package can perform a variety of functions, such as:

  • Configure the computer name and user accounts.
  • Add the computer to a domain.
  • Upgrade the Windows 10 version, such as Windows 10 Home to Windows 10 Enterprise.
  • Configure the Windows user interface.
  • Add additional files or install apps.
  • Remove installed software.
  • Configure network connectivity settings.
  • Install certificates.
  • Implement security settings.
  • Reset Windows 10.
  • Run PowerShell scripts.

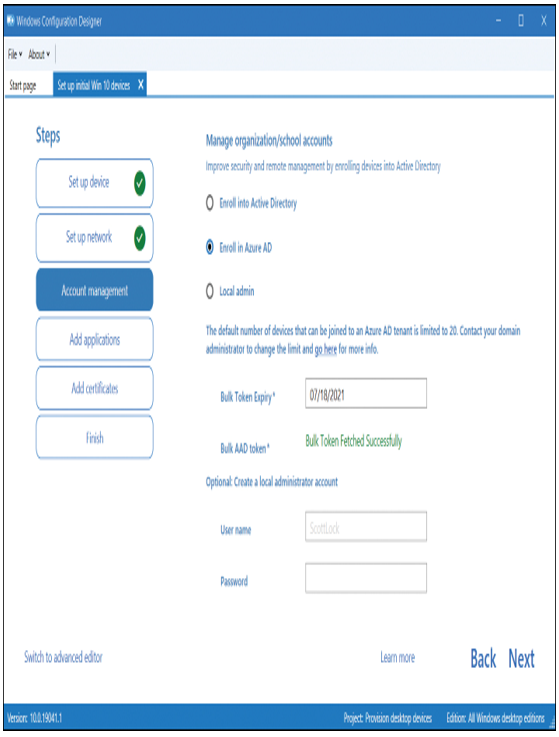
To create a provisioning package, you should complete the installation process of Windows Configuration Designer using either the Windows ADK or the Microsoft Store. Once you have done so, you are ready to create and deploy your provisioning packages. Start by opening Windows Configuration Designer. On the Start page displayed in Figure 1-1, select the option that best describes the type of provisioning that you want to do. If you’re unsure, choose the Advanced Provisioning tile.

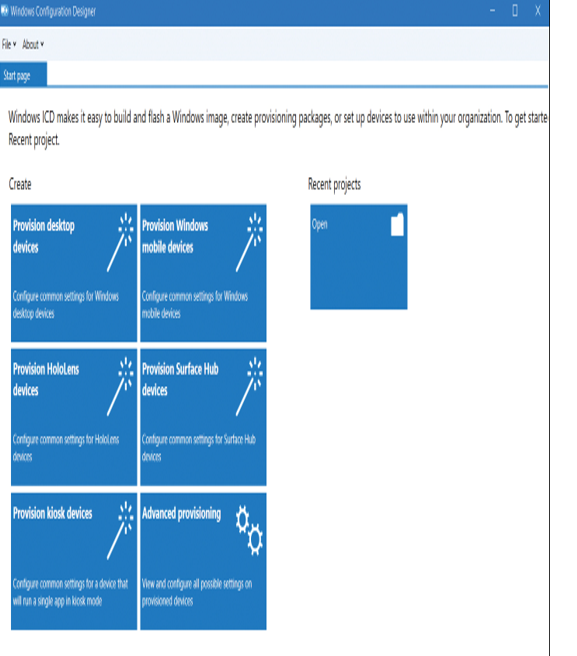
Figure 1-1 Creating a new provisioning package

Use the following procedure to create your provisioning package to deploy a universal line of business (LOB) app:

  1. Select the Advanced provisioning tile.
  2. In the New project wizard, on the Enter project details page, enter the name and a meaningful description for your provisioning package. For example, enter Deploy LOB App1 and then select Next.
  3. On the Choose which settings to view and configure page, select All Windows desktop editions and select Next.
  4. On the Import a provisioning package (optional) page, select Finish. (You can use this option to import settings from a previously configured package that mostly, but not entirely, meets your needs.)
  5. On the Available customizations page, in View, select All settings, and then expand Runtime settings, as displayed in Figure 1-2.
  6. On the Available customizations page, in the navigation pane, expand UniversalAppInstall and then select DeviceContextApp.
  7. In the details pane, in the PackageFamilyName text box, enter a name for this collection of apps. For example, enter LOB App1.
  8. Select the PackageFamilyName: LOB App1 node.
  9. In the ApplicationFile text box, select Browse, navigate to the .appx file that represents your app, and select it, as displayed in Figure 1-2.
  10. In the File menu, select Save and note the location of the saved provisioning package file.

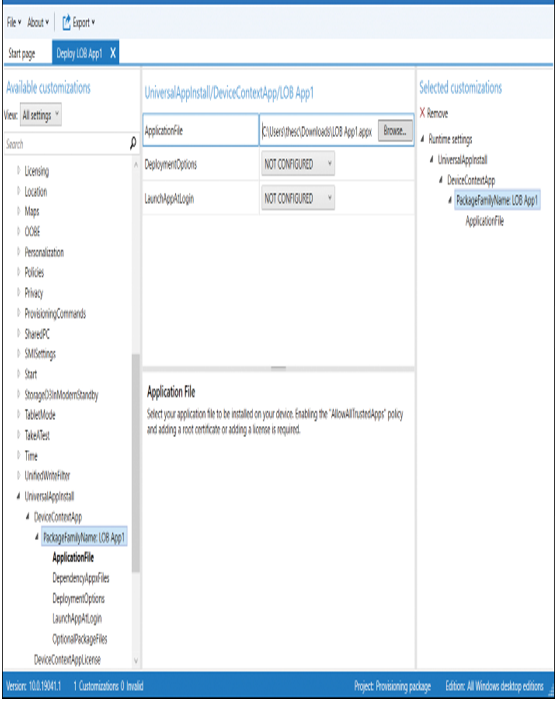
Figure 1-2 Available customizations for your provisioning package

You have created a customization for your app, and you are now ready to deploy this customization by applying the provisioning package.

Note Deploy Powershell Scripts from Provisioning Packages

If you want to use PowerShell scripts with provisioning packages, you need to select All Windows Desktop Editions on the Choose Which Settings To View And Configure page within Advanced Provisioning. You can then add command-line files in the Runtime Settings\ProvisioningCommands\DeviceContext area of the available customizations. To view detailed information about using scripts in provisioning packages, visit this Microsoft website at https://docs.microsoft.com/en-us/windows/configuration/provisioning-packages/provisioning-script-to-install-app.

Apply provisioning packages – Deploy and upgrade operating systems
Apply provisioning packages

To apply a provisioning package, you must start by exporting the package. To export your provisioning package, in the Windows Configuration Designer, use the following procedure:

  1. Select the project file from the Recent Projects area of the Start page or select File and locate the project file. (It should use the name of the project and have an .icdproj file extension.)
  2. On the menu bar, select Export > Provisioning package.
  3. In the Build wizard, on the Describe the provisioning package page, the Name box is already complete with the project name. You can now specify the Package Version number and Owner information, such as IT Admin. Complete this information and select Next.
  4. On the Select security details for the provisioning package page, choose whether you want to encrypt or sign your package (or both) and then select Next. (To digitally sign your package, you must have an appropriate digital certificate that users of your package trust.)
  5. On the Select where to save the provisioning package page, specify where you want to store the package and then select Next.
  6. On the Build the provisioning package page, select Build. Your provisioning package is exported to your specified location.
  7. The All done page appears. Make a note of the package details and then select Finish.
  8. You can now apply the package to client devices and run the .ppkg file.

Once you have configured the settings within the Windows Configuration Designer, you export the provisioning package to a .ppkg file. To secure the .ppkg file, you can optionally choose to encrypt the package and digitally sign it. Once signed, only packages that are trusted can be applied on a client computer.

You can deploy the provisioning package to users by any method, such as email, physical media, or by sharing the file using OneDrive for Business. The settings are applied to the target device by one of the following methods:

  • Running the .ppkg file
  • Adding the provisioning package using the Settings app
  • Using the Add-ProvisioningPackage Windows PowerShell cmdlet

Provisioning packages can be applied to a device during the first-run experience when a device is first turned on by using a USB drive containing the provisioning package or after the Out-Of-Box Experience (OOBE) has been completed.

Need More Review? Provisioning Packages for Windows 10

To review further details about provisioning packages, refer to the Microsoft website at https://docs.microsoft.com/windows/configuration/provisioning-packages/provisioning-packages.

Manage and troubleshoot provisioning packages – Deploy and upgrade operating systems
Manage and troubleshoot provisioning packages

You have already seen how using provisioning packages as part of your dynamic provisioning of Windows 10 can simplify your deployment processes.

The Windows Configuration Designer tool can be installed from the Microsoft Store as an app, which allows it to be regularly updated. Alternatively, you can install the Windows Configuration Designer tool as part of the Windows ADK.

The WCD interface is simple, and common tasks are offered using the available wizards, which can be used to create a provisioning package that can be used in the following environments:

  • Provision desktop devices Provides the typical settings for Windows 10 desktop devices.
  • Provision Windows mobile devices Provides the typical settings for Windows 10 mobile devices.
  • Provision HoloLens devices Provides the typical settings for Windows 10 Holographic devices, such as HoloLens headsets.
  • Provision Surface Hub devices Provides the typical settings for Surface Hub devices.
  • Provision kiosk devices Provides the typical settings for a device that will run a single app.
  • Advanced provisioning Enables you to view and configure all available settings. Choose this option if you are unsure which specific package type to use.

Most provisioning packages will be aimed at provisioning Windows 10 desktop devices and will use the advanced configuration option because this allows the greatest customization.

Provisioning packages offer administrators a quick and simplified mechanism to securely configure devices. Once created, the settings within a .ppkg file can be viewed using the WCD and edited using the built-in wizards or by using the advanced editor. When provisioning packages that need to be deployed to remote devices, they can be protected using encryption and signed.

Several usage scenarios for provisioning packages are shown in Table 1-3.

TABLE 1-3 Usage scenarios for provisioning packages

ScenarioPhaseDescription
New devices with Windows 10 need to have apps deployed to the devices.New deviceProvisioning packages can be used to deploy apps to devices.
Existing Windows 10 Pro devices need to be upgraded to Windows 10 Enterprise.UpgradeProvisioning packages can be used to change the Windows edition by deploying product keys or licenses using the Edition Upgrade settings.
You must update device drivers on Windows 10 devices.MaintainProvisioning packages can be used to deploy device drivers to devices.

When using provisioning packages, you may need to troubleshoot them if devices are not configured as expected.

There are several areas on which you can focus your attention when troubleshooting provisioning packages, as follows:

  • Configuration errors and missing customizations
  • Expired Azure AD Token
  • Export errors including encryption and signing issues
  • User issues
  • Advanced troubleshooting

If you have deployed the .ppkg file to multiple devices, and they have all failed to process the required changes, then you should first inspect the provisioning package. Locate the project file (with the .icdproj file extension) and open it using the WCD. You should then inspect the settings and confirm that they match your expectations and the design specification or change documentation for the provisioning package.

If you use the configuration wizard to configure automatic enrollment into Azure AD, as shown in Figure 1-3, you should ensure that the Bulk Token embedded inside the provisioning package has not expired. By default, this token is set to expire one month after creation, although you can manually set the token expiry date to 180 days after the creation date. If the package is used after the Bulk AAD Token has expired, the package will fail to install. You will need to edit the package, apply for a new Bulk AAD Token, and re-export the package.

Figure 1-3 Performing bulk Azure AD join by using a provisioning package

After the customization settings have been verified as correct, you should export the package again. Increment the version number to avoid confusion with the previous version of the package. Packages with the same versioning number will not be applied to the same target device twice.

If issues are suspected with either the encryption or signing of the package, you can export without these enhancements and re-deploy to your test machine to determine whether the issue remains.

For users, devices can be configured by placing the provisioning package on a USB drive and inserting it during the initial OOBE setup phase. Windows Setup should automatically recognize the drive and ask the user if he or she wants to install the provisioning package. If the package is not recognized, check that the file is in the root directory of the USB drive.

There are several tools that you can use to perform advanced troubleshooting for provisioning packages on user devices, including the following:

  • Windows Mobile devices The Field Medic app, which is available from the Microsoft Store, can create and export reports.
  • Desktop devices The Windows Performance Recorder, which is contained in the Windows Performance Toolkit, offers advanced Event Tracing for Windows. The system events recorded by this tool can be analyzed by using Windows Performance Analyzer, which is available from the Microsoft Store.
Windows 10 Subscription Activation – Deploy and upgrade operating systems
Windows 10 Subscription Activation

Windows 10 requires activation to unlock all the features of the operating system and to comply with the licensing requirements.

Once activated, Windows 10 devices can:

  • Receive updates
  • Access all Window 10 features
  • Access support

There are several types of activation that register the installation of Windows on a device with a standalone or corporate Windows 10 product key.

The three main methods of activation are as follows:

  • Retail
  • OEM
  • Microsoft Volume Licensing (volume activation)

Note More about Retail and OEM Activation

Both retail and OEM activation are outside the scope of this book and are part of the MD-100 Windows 10 exam. (See Exam Ref MD-100 Windows 10, published by Microsoft Press.)

Organizations with Enterprise Agreements (EA) can use volume activation methods. These provide tools and services that allow activation to be automated and deployed at scale. These tools and services include the following:

  • Active Directory–based activation This is an automated service that, once installed, uses Active Directory Directory Services (AD DS) to store activation objects. This simplifies the maintenance of volume activation services for an enterprise. Activation requests are processed automatically as devices authenticate to the Active Directory domain.
  • Key Management Service (KMS) This is an automated service that is hosted on a computer within your domain-based network. All volume editions of Windows 10 periodically connect to the KMS host to request activation.
  • Multiple activation key (MAK) Enterprises purchase product keys that allow a specific number of Windows 10 devices to be activated using the Microsoft activation servers on the internet.

All the preceding enterprise activation methods utilize services found within traditional on-premises, domain-based environments. An alternative method of activation is required to meet the needs of devices that are registered to cloud-based authentication and identity services, such as Azure Active Directory.

Subscription Activation allows your organization’s Azure AD tenant to be associated with an existing Enterprise Agreement; all valid devices that are connected to that tenant will be automatically activated.

Eligible licenses that can use Subscription Activation include the following:

  • Windows 10 Enterprise E3 or E5 licenses obtained as part of an Enterprise Agreement
  • Devices containing a firmware-embedded activation key
  • Windows 10 Enterprise E3 in CSP (Cloud Solution Provider), which is offered as a subscription for small- and medium-sized organizations, from one to hundreds of users

Note Firmware-Embedded Activation Key

Most OEM-provided devices designed to run Windows 8 or later will have a firmware-embedded key. You can read more information about firmware-embedded activation key licensing on the Microsoft website at https://docs.microsoft.com/windows/deployment/deploy-enterprise-licenses.

Organizations must meet the following requirements to implement Subscription Activation:

  • Enterprise Agreement or a Microsoft Products and Services Agreement (MPSA) associated with the organization’s Azure AD tenant.
  • Windows 10 Pro or Windows 10 Enterprise is installed on the devices you want to upgrade.
  • Azure AD for identity management.
  • All devices are either Azure AD–joined or are members of an AD DS domain that is synchronized to Azure AD using Azure AD Connect.

If all the requirements are met, when a licensed user signs in using their Azure AD credentials using a device, the operating system switches from Windows 10 Pro to Windows 10 Enterprise and all Windows 10 Enterprise features are then available. This process takes place without entering a product key and without requiring that users restart their computers.

Exam Tip

Devices that have been upgraded using Subscription Activation must be able to connect to the Azure AD tenant at least every 90 days to remain licensed. If the Azure AD tenant expires or the user license is unassigned, then the device will revert to Windows 10 Pro.

Azure AD Join with automatic MDM enrollment – Deploy and upgrade operating systems
Azure AD Join with automatic MDM enrollment

You can dynamically provision Windows 10 devices using Azure AD and a Mobile Device Management (MDM) solution, such as Microsoft Intune. Once a device is enrolled into management, Microsoft Intune can deploy compliance and corporate security policies to the device in a similar way (but not the same) as Group Policy objects are used within a domain-based environment to configure computers.

MDM can be used to add or remove apps, restrict device features, and more. Through the application of MDM policies, Azure AD can block or allow access to corporate resources or applications based on the status of the device compliance.

To benefit from the cloud-based dynamic provisioning, you need the following requirements:

  • Windows 10 Pro or Windows 10 Enterprise
  • Azure AD for identity management
  • A mobile device management solution, such as Microsoft Intune
Perform Azure AD join

In a traditional domain-based environment, the protection of user identities is a major security concern. With a username and password, a malicious hacker can cause havoc on any system. For a cloud-enabled workplace, the device is also a key component of your infrastructure. In a similar way to the user, the device is another identity that you need to protect. Azure AD allows you to join Windows 10–based devices to the cloud-based directory, and you can provide management tools to keep the device healthy and safeguarded.

For some businesses, the traditional on-premises model serves them, and they may not want to (or need to) change. Azure AD works very well in the following scenarios:

Cloud-based services and resources When most of the applications and resources that the organization uses are in the cloud, such as Microsoft 365 apps (Office 365 ProPlus) or Dynamics 365, joining client devices to Azure AD can increase the usability and ease of access.

Bring Your Own Device (BYOD) Users can join their devices to your business environment. Azure AD can manage and protect resource access for Windows 10 and non-Microsoft devices, such as iPads or Android tablets, that cannot join an AD DS domain. Personal and business data can be kept separate, and business data can be wiped from the device when the device leaves (or is removed from) management.

Mobility of the workforce Many organizations have employees working remotely or from home. In settings where workers infrequently visit a traditional on-premises domain environment, opting for a cloud-based management solution could be beneficial. Azure AD and Intune support the joining and remote management of mobile devices such as laptops, tablets, and smartphones.

Users can join Windows 10 devices to Azure AD during initial Windows 10 setup, or a device can be joined at a later stage by using the Settings app. Windows 10 devices can connect to Azure AD in several ways, as follows:

  • Join a new Windows 10 device to Azure AD
  • Join an existing Windows 10 device to Azure AD
  • Register a Windows 10 device to Azure AD

Exam Tip

You can only join Windows 10 devices to Azure AD. iOS and Android devices can be registered but not joined.

Join a New Windows 10 Device to Azure AD – Deploy and upgrade operating systems
Join a New Windows 10 Device to Azure AD

You can use Windows Autopilot to manage a device once it’s powered. Autopilot guides the user to enable the device to be joined to Azure AD and auto-enrolled in Microsoft Intune. However, if the organization does not use Windows Autopilot, the user can manually take a new Windows 10 device and join the device to Azure AD during the first-run experience.

If the device is running either Windows 10 Professional or Windows 10 Enterprise, the Out-Of-Box Experience (OOBE) will present the setup process for company-owned devices, which is described below.

To join a new Windows 10 device to Azure AD during the first-run experience, use the following steps:

  1. Start the new device and allow the setup process to begin.
  2. On the Let’s start with region. Is this correct? page, select the regional setting that you need and select Yes.
  3. On the Is this the right keyboard layout? page, select the keyboard layout settings and select Yes.
  4. On the Want to add a second keyboard layout? page, add a layout, or select Skip.
  5. The computer attempts to automatically connect to the internet, but if it does not succeed, you will be presented with the Let’s connect you to a network page where you can select a network connection.
  6. On the Sign in with Microsoft page, enter your organization or school account and select Next.
  7. Enter your password and select Next.

 Exam Tip

If the Azure AD administrator has configured it, you might be prompted to confirm your identity using another authentication factor, such as a text message, or use of the Authenticator app.

  1. Your device is now Azure AD joined and enrolled in Intune for MDM. Depending on settings, you will be presented with the Setting up your device for work page.
  2. On the Choose privacy settings for your device page, choose the appropriate settings and then select Accept. Device setup might continue, depending on the settings being applied to your device through MDM.
  3. Depending on organizational settings, your users might be prompted to set up Windows Hello. By default, they will be prompted to set up a PIN. When prompted to set up a PIN, select OK.
  4. In the Set up a PIN dialog box, enter the desired PIN twice and select OK. Your desktop should now display.

You should now be automatically signed in to the device and joined to your organization or school Azure AD tenant and presented with the desktop.

Join an Existing Windows 10 Device to Azure AD – Deploy and upgrade operating systems
Join an Existing Windows 10 Device to Azure AD

In this method, you join an existing Windows 10 device to Azure AD. You can join a Windows 10 device to Azure AD at any time using the following procedure:

  1. Open the Settings app and then select Accounts.
  2. In Accounts, select the Access work or school tab.
  3. Select Connect.
  4. On the Set up a work or school account page, under Alternative actions, select Join this device to Azure Active Directory, as displayed in Figure 1-4.

Figure 1-4 Joining a device to Azure AD

  1. On the Sign in page, enter your work or school username and select Next.
  2. On the Enter password page, enter your password and select Sign in.
  3. On the Make sure this is your organization page, confirm that the details on the screen are correct and then select Join.
  4. On the You’re all set! page, select Done.
  5. To verify that your device is connected to your organization, you should see your Azure AD email address listed under the Connect button and connected to Azure AD.

If you have access to the Azure Active Directory portal, then you can confirm that the device is joined to Azure AD by following these steps:

  1. Sign in as global admin to the Azure portal at https://portal.azure.com.
  2. On the left navigation bar, select Azure Active Directory.
  3. In the Manage section, select Devices.
  4. Verify that the device is listed, as displayed in Figure 1-5.

Figure 1-5 Viewing joined devices in Azure AD