You connect a Windows 10 device to Azure Active Directory using the Add Work Or School Account feature found in the Settings app. Device registration can be used to allow devices to be known by both Azure AD and MDM solutions.
Devices that are registered with Azure AD and managed by Microsoft Intune can have conditional access rules applied to them. In this way, personally owned devices can be configured so that they meet your corporate standards for security and compliance.
Use the following procedure to take an existing Windows 10 device and register it with Azure AD:
Open the Settings app and click Accounts.
In Accounts, select the Access work or school tab.
Select Connect.
On the Set up a work or school account page, displayed in Figure 1-4, enter your organizational email account, select Next, and then complete the wizard.
To verify that your device is registered to your organization or school Azure AD tenant, complete these steps.
Open the Settings app and select Accounts.
In Accounts, select the Access work or school tab.
On the Access work or school page, verify that your organization or school Azure AD email address is listed under the Connect button.
Note Register Byo Devices to Azure AD
You can register a personally owned device with Azure AD using the Set Up A Work Or Education Account wizard. Personal devices are then known to Azure AD but are not fully managed by the organization.
The role of MDT and Configuration Manager
If your organization is predominantly managing an enterprise on-premises environment, it’s highly likely you’ll be using MDT and possibly also Configuration Manager. These tools enable you to deploy, configure, and manage Windows 10, apps, and drivers within your infrastructure. You’ll also likely be using Configuration Manager to collect data from your devices for inventory, upgrade planning, update status, and many other purposes.
Some organizations might intend to manage a hybrid infrastructure, with devices configured as part of both an on-premises Active Directory forest and enrolled in Intune. In these scenarios, you’ll need to consider which device management workloads are best handled by Intune, and which by Configuration Manager.
Implementing MDT as Part of your Deployment Strategy
MDT provides a unified collection of tools and related processes. You can use these tools and processes to implement a complete deployment solution for your on-premises environment.
Note Zero-Touch Installation
By combining MDT with Configuration Manager, you can implement zero-touch (ZTI) deployments.
Before you can use MDT, you must ensure your infrastructure meets the following requirements:
AD DS Provides authentication, and also joins endpoints to Active Directory during deployment.
Windows Server Used to host MDT deployment shares and related content.
Windows Assessment and Deployment Kit (Windows ADK) Provides additional capabilities during deployment.
Optionally, you can also consider integrating MDT with the following additional components:
Windows Deployment Services (WDS) Enables you to provide network-driven operating system deployment to bare-metal devices. Installed as a Windows Server role.
Windows Server Updates Services (WSUS) Enables you to manage Windows Updates during the deployment process. Installed as a Windows Server role.
After you’ve installed MDT on your Windows Server, you can begin to use it to support your on-premises deployments. MDT consists of the following key components:
Boot images These are Window PE images used to initiate operating system deployment.
Note Pxe Boot
You can start boot images from bare-metal computers using PXE network boot.
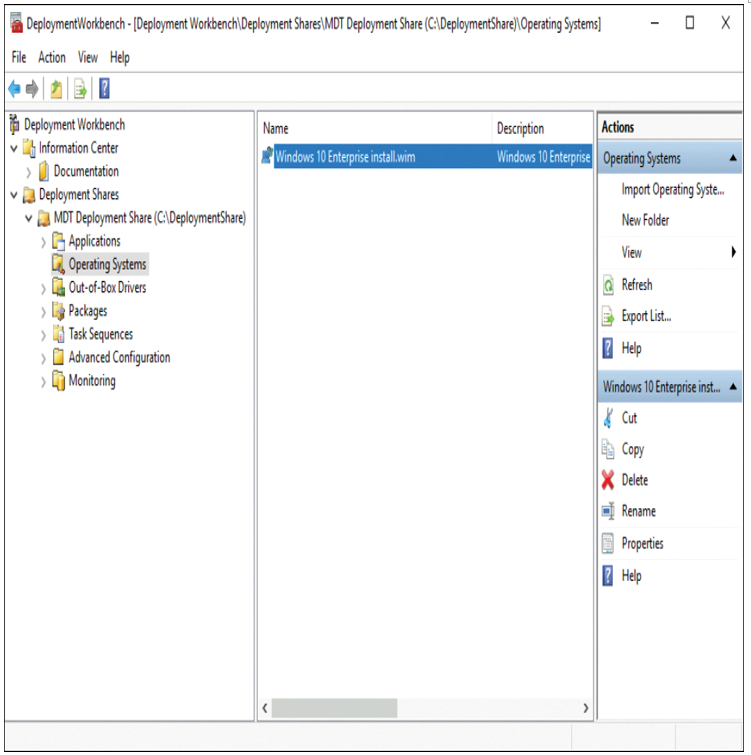
Operating system images These are either full source files or custom images that you import into the Workbench. Figure 1-6 displays the Deployment Workbench in MDT, with the Operating Systems folder open.
Figure 1-6 Adding operating system images in MDT
Applications Enables you to add any apps that you want to deploy to devices. MDT supports a wide variety of app install formats, including MSI packages, .exe files, and Universal Windows apps.
Drivers Used to deploy required driver updates to your devices.
Packages Can be used to deploy packages, such as language packs. Can also be used for Windows updates, although WSUS is usually more appropriate.
Task sequences Task sequences are the collection of actions performed to complete a specific job. You use predefined templates to create your task sequences. Tasks might include: Gather, Format and Partition, Inject Drivers, Apply Operating System, or Windows Update.
You must determine whether you can use MDT as part of your organization’s deployment strategy. If all your users’ devices are cloud managed, and you have little or no on-premises infrastructure, then MDT isn’t suitable for you. However, in hybrid environments, you’ll need to consider whether to use MDT, with or without Configuration Manager, or to use Intune.
Answering YES to all or most of the following questions suggests that MDT would be useful in your organization:
Are you mostly deploying to AD DS joined devices?
Do you need to deploy a standard image to your users?
Will many applications be part of this image?
Must all your devices be the same?
Will some of your devices be bare-metal?
However, if you can answer YES to the following questions, you might consider using Windows Autopilot to provision your devices:
Are you mostly provisioning devices that are NOT AD DS joined?
Will most of your devices have dissimilar configurations?
Do you intend to use Intune as a means to deploy and configure apps?
Do you want to use Windows Update for Business to deliver Windows 10 updates?
Will users have a choice about which applications they have?
Implementing Configuration Manager as Part of your Deployment Strategy
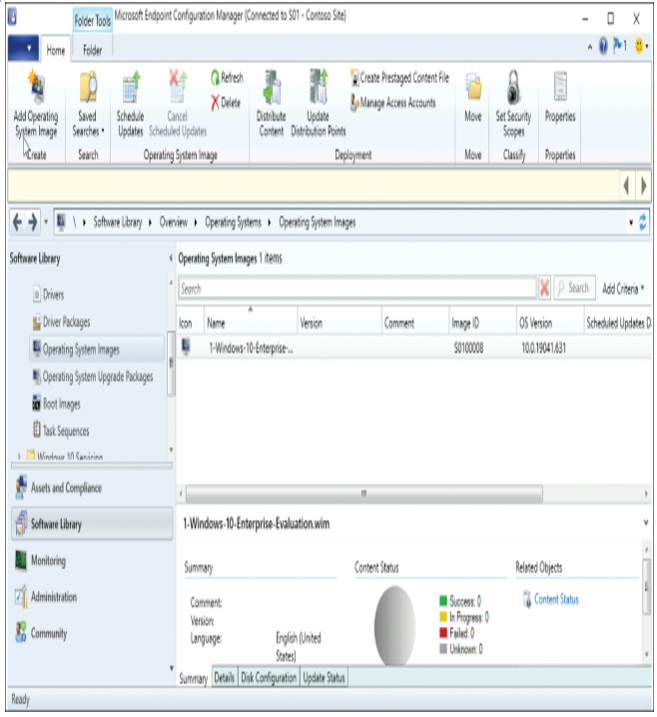
Many organizations have relied on Configuration Manager to not only manage their operating system deployments, but to act as the core of their device management strategies. Although Configuration Manager, displayed in Figure 1-7, has been around for quite a while, it still has a critical role to play, acting as a bridge between traditional and modern management. This is especially true for organizations managing hybrid devices (those joined both to Azure AD and AD DS).
Figure 1-7 The Operating System Images node in the Software Library
Configuration Manager offers a wide range of services, including the following:
Operating system deployment
Application management
Update and servicing management
Device inventory
Cloud management capability
Advanced reporting capability
Integration with Azure AD
Integration with Desktop Analytics
Remote control
User state migration
The question is, can Configuration Manager help your organization with their Windows 10 deployment strategy, or are MDT or Intune sufficient? Configuration Manager uses boot and operating system images, much like MDT. It also supports capabilities that help deliver upgrade packages, device drivers, and operating system and software updates.
Configuration Manager also uses task sequences as the means to complete a collection of actions. However, Configuration Manager extends these capabilities by supporting schedule-based deployments. This extends MDT’s lite-touch (LTI) deployment model to ZTI.
Configuration Manager uses task sequences to complete the following typical tasks:
In situations where organizations have an existing environment of Windows 7 and/or Windows 8.1 devices that are fully working and supported, Microsoft recommends using an in-place upgrade strategy to deploy Windows 10 to these devices.
The upgrade process takes care of updating the operating system while retaining the apps, user data, and user settings. Utilizing in-place upgrades can offer a low-risk, quick, and reliable method of transforming devices and enabling users to be productive once the upgrade has completed.
If administrators fear that an existing installation is “old” or not a reliable candidate to upgrade to Windows 10, they could redeploy the legacy operating system—complete with apps, policies, and settings—and then perform the in-place upgrade shortly afterward. Another benefit of using an in-place upgrade approach is that driver and app compatibility issues are minimized.
When planning to deploy Windows 10, you should consider whether your existing version of Windows can be directly upgraded to Windows 10. You should also consider whether you can migrate from one edition of Windows 10 to a different edition of the same release.
As long as you are running Windows 7 or a later operating system, you can upgrade to Windows 10. This includes upgrading from one release of Windows 10, such as Version 2004, to a later release, such as Windows 10 Version 20H2.
When upgrading from one version of Windows to a later version, the upgrade process can preserve personal data, settings, and applications.
In a few situations, you can perform an edition downgrade. In these situations, you should note that all personal data is maintained; however, any incompatible applications and settings will be removed.
You should review the information shown in Table 1-4, which shows the various upgrade and downgrade paths available in Windows 10. The Windows 10 Mobile and Windows 10 Mobile Enterprise editions have been omitted from the table because these versions are nearing the end of support from Microsoft at the time of this printing.
TABLE 1-4 Windows 10 upgrade and downgrade paths
Destination Edition
Starting Edition
Windows 10 Home
Windows 10 Pro
Windows 10 Pro Education
Windows 10 Education
Windows 10 Enterprise
Windows 7
Starter
X
X
X
X
Home Basic
X
X
X
X
Home Premium
X
X
X
X
Professional
D
X
X
X
X
Ultimate
D
X
X
X
X
Enterprise
X
X
Windows 8.1
(Core)
X
X
X
X
Connected
X
X
X
X
Pro
D
X
X
X
X
Pro Student
D
X
X
X
X
Pro WMC
D
X
X
X
X
Enterprise
X
X
Embedded Industry
X
Windows RT
Windows Phone 8.1
Windows 10
Home
X
X
X
X
Pro
D
X
X
X
X
Education
X
D
Enterprise
X
X
When reviewing the table, use the following key:
X The upgrade path is supported.
D The downgrade path is supported.
Note Windows 10 Edition Upgrade
For organizations performing a supported upgrade from one edition of Windows 10 to another, the process is quick and easy. The new product key can be added to the device, and the device will be upgraded. There are more than 84 possible variants of the edition upgrade; some require a reboot and others allow the upgrade without a reboot. You should review the table shown on the Microsoft website at https://docs.microsoft.com/windows/deployment/upgrade/windows-10-edition-upgrades.
Organizations with an expired or expiring volume license agreement can opt to downgrade their edition of Windows 10 to an edition with an active license. Like the options for performing an edition upgrade, if a downgrade path is supported, then the user’s apps and settings will be available in the downgraded version of Windows 10.
You cannot downgrade from any edition of Windows 10 to Windows 7, 8, or 8.1. You also cannot downgrade from a later version of Windows 10 to an earlier version of the same edition (for example, Windows 10 Pro Version 1909 to Version 1903) unless you use the built-in rollback process.
Review the supported Windows 10 downgrade paths shown in Table 1-5. If a path is not supported, then you will need to perform a clean installation.
TABLE 1-5 Windows 10 upgrade and downgrade paths
Destination Edition
Home
Pro
Windows 10 Pro for Workstation
Pro Education
Education
Enterprise LTSC
Enterprise
Starting Edition
Home
Pro
Pro for Workstation
Pro Education
Education
X
X
X
S
Enterprise LTSC
Enterprise
X
X
X
S
When reviewing the table, use the following key:
X = The downgrade path is supported.
S = Supported, but path is not considered a downgrade or an upgrade.
[blank] = Not supported or not a downgrade option.
Note Windows 10 Enterprise Subscription Activation
For organizations using Windows 10 Enterprise Subscription Activation, if the license expires, devices will automatically revert to the original edition when the 90-day grace period expires. For example, if you originally upgrade to Windows 10 Enterprise from Windows 10 Pro, then the device will revert to Windows 10 Pro. If you want to downgrade from Window 10 Enterprise to Windows 10 Pro for Workstations, Pro Education, or Education editions, you must obtain an additional activation key, which will supersede the original firmware-embedded Windows 10 Pro key.
If you have devices that ship with Windows 10 in S Mode, the edition of Windows can be upgraded at any time using the Microsoft Store. The switch from S Mode to Windows 10 Home, Pro, Pro Education, or Enterprise is a one-time switch, and the device cannot be reverted to Windows 10 in S Mode without a complete wipe and reload of the operating system.
Table 1-6 shows several methods you can use to switch devices out of Windows 10 in S Mode.
TABLE 1-6 Windows 10 in S Mode switch methods
Tool
Description
Settings app
Unless it’s been disabled, this app allows you to configure one device at a time.
Microsoft Store
Unless it’s been disabled, the Microsoft Store allows you to configure one device at a time; a Microsoft account is required.
Microsoft Intune
Allows you to configure a group of devices that are known to Azure AD.
To switch one device at a time, you can use the Settings app and then perform Activation on the device. Alternatively, a user with a Microsoft account can use the Microsoft Store.
Organizations can use the following procedure to switch multiple devices in bulk using Microsoft Intune:
Open the Microsoft Endpoint Manager admin center and sign in with a global administrator account.
In the navigation pane, select Devices.
Then select Configuration profiles.
On the Configuration profiles page, select Create profile.
On the Create a profile blade, in the Platform list, select Windows 10 and later.
In the Profile type list, select Templates; then select Edition upgrade and mode switch.
Select Create.
In the Edition upgrade and mode switch wizard, on the Basics tab, enter a name and description, and then select Next.
On the Configuration settings tab, expand the Mode switch (Windows Insider Only) list.
In the Switch out of S mode list, displayed in Figure 1-8, select Switch, and then select Next.
Figure 1-8 Select Edition Upgrade And Mode Switch settings
On the Assignments tab, define the groups to which you want to assign the profile, and then select Next.
On the Applicability Rules tab, define any filtering rules you want to use. These determine specific operating system editions that are affected by the profile. Select Next.
On the Review + create tab, select Create. The profile is created.
Note Block Switching out of Windows 10 In S Mode
You can control the ability of which devices or users can switch out of Windows 10 in S Mode by using Group Policy. Review the GPO at Device Configuration\Profiles\Windows 10 And Later\Edition Upgrade And Mode Switch In Microsoft Intune.
In previous versions of Windows, you could use several tools to help you assess, perform, and manage the task of upgrading to a new operating system. This process includes tools, such as the Microsoft Assessment and Planning (MAP) toolkit and the Application Compatibility Toolkit (ACT), which are included in the Windows Assessment and Deployment Kit (Windows ADK). These tools assist in discovering applications and device drivers and then testing them for potential compatibility issues with the new OS. All these tools and processes require specialist knowledge and often add significant time and cost to the rollout project.
Many large enterprises use Configuration Manager, which is a powerful, yet complex, tool to manage devices, apps, and upgrades within an organization. Configuration Manager (Current Branch) continues to be supported by Microsoft and can be used to upgrade a Windows 7 or later operating system to Windows 10.
Plan app compatibility
Generally speaking, applications designed to work with Windows 7 will work well with Windows 10. However, applications designed to work with Windows XP might well manifest installation or runtime problems. This is primarily because the operating system architecture and the security model for Windows XP differs from that used by all subsequent versions of Windows. If you’re still using older applications, you’ll need to create an inventory of those apps, and test their compatibility with Windows 10.
If you encounter problems when running older apps with Windows 10, use the following high-level procedures to attempt to resolve most common issues:
Run as administrator Most Windows XP-designed apps expect that all local users are administrators. This is no longer the case. But by running as administrator, you can provide a familiar context for your legacy apps.
Make sure all application dependencies are installed An older application might require a Windows component that is not installed.
Use the Application Compatibility Toolkit (ACT) to resolve runtime issues This toolkit is part of the Windows ADK. It provides the Standard User Analyzer tool and the Compatibility Administrator. If your application doesn’t work properly, load the Compatibility Administrator and run the application within it. Then apply mitigations until the app runs successfully.
Exam Tip
You can use the Compatibility Administrator to create an application fix, sometimes referred to as a shim. This is a file with an SDB extension. You apply the fix to other instances of the installed app by using the sdbinst.exe command-line tool.
Correct restrictive AppLocker policy settings in Group Policy If you find a policy that prohibits the application from running, either remove the policy, or else disable the specific blocking rule.
If your app doesn’t work, and you’ve tried adding dependencies, and repairing or reinstalling the app, you might need to consider one of the following approaches:
Update the app Download application updates from the software vendor, and apply those.
Upgrade the app If updates don’t work, or aren’t available, consider upgrading to a more recent version of the app.
Consider virtualizing the app If the app works on Windows XP, consider creating a Windows XP virtual machine, and running the app on that VM.
Use RemoteApp apps In an on-premises environment, consider deploying Remote Desktop Services (RDS) and then installing and publishing the app in an RBS site collection. Users launch RemoteApp apps by selecting them from Start like any other app. But the apps actually run on the configured RDS server.
Implement Windows Virtual Desktop Providing a similar functionality to RDS, you can use Azure to host your virtualized apps.
Replace the app If all else fails, you might need to consider finding a replacement app. Make sure you consult with your users about the required functionality. What we in IT consider to be a better app might not provide the specific function the users require.
Note In-Place Upgrades and Legacy Apps
When you perform in-place upgrades, applications and their related data and settings are retained. Sometimes, by performing in-place upgrades rather than migrations to Windows 10, you can avoid legacy application installation issues.
When you upgrade to Windows 10, unless you perform an in-place upgrade, you might overlook the migration of the user’s app data and Windows settings.
Losing app data and personalized settings can have a significant effect on their productivity and even their morale. Users often invest a huge amount of time and effort configuring their Windows environment. Also, they often spend a lot of time customizing their apps, such as developing templates and toolbars. By migrating settings such as these, you are likely to reduce the number of helpdesk calls and avoid user downtime required to customize their desktops and find missing files.
You should aim to migrate user settings, which are often contained within their user profiles, during your Windows 10 deployment project.
Following are the two traditional methods of upgrading to Windows 10 that don’t involve an in-place upgrade:
Side-by-side migration This type of migration is used when the source and destination computers for the upgrade are different machines. You install a new computer with Windows 10 and then migrate the data and user settings from the computer running the older operating system to the new computer.
Wipe-and-load migration In this scenario, the source and destination computer are the same. You back up the user data and settings to an external location and then install Windows 10 on the user’s existing computer. Afterward, you restore user data and settings.
User State Migration Tool
For large-scale deployments, you can automate much of the user profile migration process by using deployment automation tools, such as Configuration Manager or the MDT. Both solutions use the User State Migration Tool (USMT), which is part of the Windows ADK.
For smaller migrations, you can use USMT directly from the command line to capture user accounts, user files, operating system settings, and application settings; you can then migrate the captured settings to a new Windows installation.
Although quite dated, USMT has received several updates, which make it more secure and usable, and is available as a command-line tool. The features include the following:
Size estimation of the migration stores Allows you to gauge the amount of storage you will need to perform a data capture for a targeted device running Windows.
Encryption of the migration stores This protects the information stored in the user’s profile, reducing the risk of data being compromised while being stored.
Hard links to the migration store This is useful for PC refresh scenarios that do not involve the reformatting of the primary Windows partition. Using a hard-link migration store with USMT allows the restore process to come from the same local partition, significantly increasing transfer performance.
Perform offline migrations You can run migrations from within a Windows Preinstallation Environment (WinPE). You can also perform migrations from the data stored in Windows.old directories.
You perform a user state migration in two phases, as follows:
Settings and data are captured (collected) from the source and stored in a secure migration store using the ScanState tool.
Captured settings and data are restored to the destination computer using the LoadState tool.
Also, USMT can be scripted to enhance efficiency, and it can be customized with settings and rules using migration XML files:
MigApp.xml
MigDocs.xml
MigUser.xml
Custom XML files that you can create
The types of data that USMT can capture and migrate are shown in Table 1-7.
TABLE 1-7 Data types accessible by USMT
Data type
Example
Description
User accounts, user settings, and user data
My Documents, My Video, My Music, My Pictures, Desktop files, Start menu, Quick Launch settings, and Favorites
Local and domain-based user accounts. Folders from each user profile.
USMT searches fixed drives, collecting files that have any of the filename extensions, folders, and Registry keys that are defined in the configuration XML file.
NTFS permissions
Access control lists (ACLs)
USMT can migrate the ACL information for specified files and folders.
Operating system components
Mapped network drives, network printers, folder options, EFS files, users’ personal certificates, and Internet Explorer settings
USMT migrates most standard operating system settings.
Supported applications settings
Microsoft Office, Skype, Google Chrome, Adobe Acrobat Reader, Apple iTunes, and more
USMT will migrate settings for many applications, which can be specified in the MigApp.xml file. The version of each application must match on the source and destination computers. With Microsoft Office, USMT allows migration of the settings from an earlier version of an Office application.
As shown in Table 1-7, the list of settings that can be migrated is quite extensive. However, the following settings cannot be migrated with USMT:
Local printers and hardware-related settings
Device drivers
Passwords
Customized icons for shortcuts
Shared folder permissions
Files and settings if the operating systems have different languages installed
USMT is comprised of several command-line tools and configuration files, which use XML files to store customizations. The USMT components are described in Table 1-8.
TABLE 1-8 USMT components
Component
Description
ScanState.exe
Scans a source computer and collects files and settings, writing them to a migration store. (The store file can be password protected and can be compressed and encrypted if required. You cannot use the /nocompress option with the /encrypt option.) You can turn off the default compression with the /nocompress option.
LoadState.exe
Migrates the files and settings from the migration store to the destination computer.
USMTUtils.exe
Used to compress, encrypt, and validate the migration store files.
Migration XML files
MigApp.xml, MigUser.xml, or MigDocs.xml files, and custom XML files that USMT uses to configure the process.
Config.xml
Used with the /genconfig option to exclude data from a migration.
Component manifests
Controls which operating system settings are to be migrated. These manifests are specific to the operating system and are not modifiable.
Use the following steps to initiate the collection of the files and settings from the source computer and back up the settings and files to a network share:
Ensure you have a backup of the source computer.
Close all applications.
Using an account with administrative privileges, run ScanState; use the following command:
4. Run UsmtUtils with the /verify switch to ensure that the migration store is not corrupted; use the following command:
Click here to view code image
UsmtUtils /verify C:\mystore\storename.img
5. On the destination computer running Windows 10, you need to install any applications that were on the source computer, and then close any open applications.
6. Run the LoadState command, specifying the same .xml files and network share location that you used when you ran ScanState; use the following command: